Everything you always wanted to know about “Pop offs” but were afraid to ask!
As published in Model Aviation Magazine Feb 2012
by Gordon Buckland
The discussion on premature release from the launch apparatus has recently been a hot topic and getting a lot of air-time on RCSE, online forums and during discussions at club meetings. Is this “popping off” to be blamed on the use of unfamiliar club wenches, poorly setup launch paraphernalia, or is inept stick manipulation by the pilot the cause? Much discussion has been had about the need to allow a free pop-off or two at contests, as though this malady can take such hold on a pilot – that the average participant just can’t eliminate it.
Seriously though – flatland soaring includes “the launch,” – an inescapable starting task which requires careful model setup, launch practice and a certain amount of skilled execution to achieve a consistent and competitive result. Many pilots practice the duration task diligently in order to execute it well on contest day. The launch requires practice too. The first part of that duration task is “the launch” and if you are still releasing prematurely for a low launch, during the winch phase either in practice or at contests, then you clearly need to pay more attention to the various aspects that cause pop-offs rather than being concerned about whether you should be entitled to a re-flight if you do pop off.
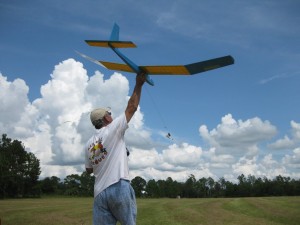
The grip doesn’t need to be anywhere as firm with a Gentle Lady but as Ed White of the Buzzards club demonstrates here it still needs to be released with enough forward momentum to be flying out of his hand.
The proliferation of USA flatland TD (thermal duration) contests using unfamiliar and often powerful club winches may be part of the problem. Often pilots from visiting clubs are not used to the higher winch power and twine strength on a given contest winch. With so little stretch in the twine on the average US club winch, the initial throw becomes a scary event for those who are not ready and as the pedal is depressed – almost instantly the model needs to be released with a firm throw. This requires timing and a certain amount of co-ordination. An inexperienced pilot can quickly be in trouble with a model improperly released with insufficient airspeed and a resultant dropped wing combined with rapid acceleration to one side causes a rapid nose up and inevitable pop-off. These mishaps can often be overcome by simply asking another experienced pilot to throw your model. This is a sensible approach if you feel any lack of confidence and reduces the risk of a bad start. In my case (to be sure of a good start,) I have flown every round of competition in every winch launched class at the Nats for the last three years and have only thrown my own model once or twice. Have I popped off at the Nats? Not yet! So lets examine what are the root causes for pilots suffering from pop-offs and what we can do to eliminate them entirely.
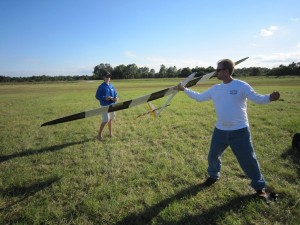
The throw starts with taking a good comfortable grip on the sailplane combined with a stable stance ready for the throw. Here John Graves demonstrates Dillon’s Pike.
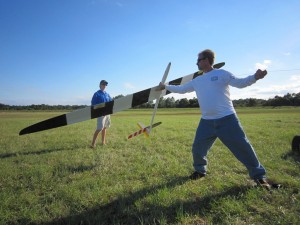
As the winch is started John stiffens his elbow and leans back against the tension ready to throw the model at the correct moment.
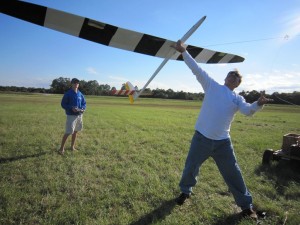
With a smooth over-arm throw John releases the Pike at the correct angle of climb with wings level and lots of forward momentum for a perfect start to a great launch.
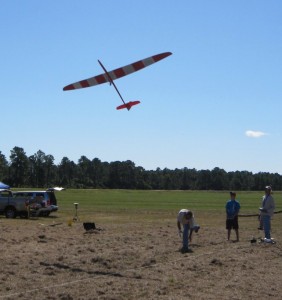
This shot shows Johns “follow through” after the throw, while the model climbs out at a great angle of climb with plenty of speed.
There are three important elements to making a good throw.
1. Tension – Before the throw it is important to hold the correct amount of line tension for the class and strength of the model and prevailing wind speed.
2. Firm Throw – It is vital to throw the model firmly enough to provide instant flying airspeed as the model leaves the hand.
3. Model Attitude – Having the wings level at release plus pointing the fuselage;
(a) either relatively flat requiring the model to rotate or
(b) at the correct upward angle to put it directly into its climb attitude is preferred.
Clearly the model setup is also vitally important if you want to get consistent, reliable and pop-off free launches. This setup takes time at the practice field but has a great payoff if careful attention is paid to the step by step process. Each of the following variables will have an effect on your model’s launch performance and setting them up correctly will definitely help reduce your risk of a low launch.
1. Correct CG location is a basic but very important. Too rearward reduces pitch stability and in extreme cases can lead to instability on tow and contribute to pop-offs. Too forward a CG will require extra stab incidence (or up elevator) to trim for level flight and this can also cause problems on tow as discussed in point 2.
2. Stab to wing incidence needs to be reduced on some older model designs as “old school” setups caused a big variation in the sailplanes attitude on tow at varying airspeeds. Many of these older designs were built with an overly generous angle of incidence causing a sudden nose-up of the model as it accelerated rapidly just after being released. Reducing this angle of incidence nearer to zero (while moving the CG back) will also reduce this attitude variation at differing speeds.
3. The tow hook location is easily adjusted and the most desirable hook location is more rearward – generally no more than 1/8” in front of the CG for optimum launch performance. For a less aggressive approach (and for safety when first setting up a new model,) a more forward position is preferred initially. By then making small changes rearward 1/8” at a time, the optimum hook location can be found where the model rotates to climb right out of the hand and maintains good line tension immediately from the throw. If a model is a little unruly on tow it can be calmed down by moving the hook forward or reducing up elevator launch preset.
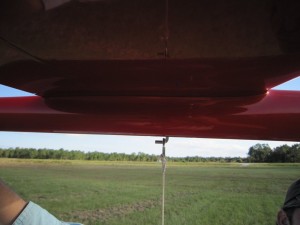
Use a real tow ring attached to some twine and hook it on your model pulling down hard on the twine as you move the line rearward to see at what angle the ring releases from the hook.
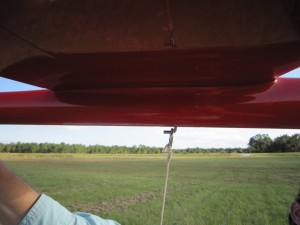
Here the ring is just ready to come off the hook as the angle backwards passes about 8 degrees from a right angle to the fuselage. That is right where you want it to release for a pop-off resistant setup.
4. With the variable tow ring sizes and gauges of wire used in different contests, it pays to add a tow hook groove for the ring to seat in. With a well setup sailplane, this is a sure method of eliminating pop-offs entirely.
Carefully file a very shallow groove at the front of the hook where the tow ring seats, using a small 3/16” dia round file. (A really nice set of useful needle files for this purpose can be purchased at Harbor Freight for $4.99 – Part Number 4614.) This carefully created gentle groove will allow the tow ring to remain positively seated without slipping off until the towline is pulling back past 90 degrees. As you begin filing your groove, use a test rig such as a typical tow ring tied to a piece of twine and test the angle at which the tow ring actually releases from the model. Hook it on to your tow hook and pulling down firmly on the twine, gradually pull the line back toward the tail of the model until it is at an angle greater than 90 degrees to the fuselage. At a certain point it will slip off the tow hook releasing the model. Without any groove this simple test will show the ring slipping off the hook at just one or two degrees past 90. By filing your shallow groove it will require a greater angle rearward to release from this “detent”. I have found that the tow ring slipping off the tow hook at an angle of approx 8 degrees past vertical works well for me. Filing the groove a little at a time with regular testing is extremely important as a groove that is too deep can cause the model to stay “hooked up” at the top of the launch and that is definitely not what you want.
This carefully filed “detent” will not allow the model to pop-off the line during a normal launch, but will allow the model to easily release as you pull up elevator at the bottom of “the bucket” and the fuselage angle passes more than 8 degrees beyond a right angle from the towline.
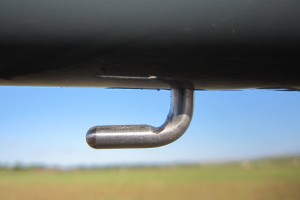
This groove is an example of where a hook has been filed too deep and this groove will cause this model to “hang-up” sometimes which can steal a lot of energy from what might have been a good zoom.
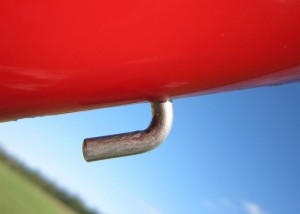
The groove needs to be filed just like the one on this Xplorer with just enough depth to hold the ring from slipping off the hook until it has an angle backwards.
Assuming you have paid attention to the model setup steps above and you have correctly filed your groove in the tow hook you can confidently work on optimizing your launches without fear of any pop-offs. Your sailplane will remain on hook in almost any situation except when you pull up to get off the tow line after you have dived to convert your line tension into airspeed and altitude.
I work on the setup of all my sailplanes and I practice the launch as part of the contest task. In the last 3 years I have flown hundreds of contest rounds, in many locations in USA, with a variety of winch equipment, without one single contest pop-off causing a low launch. With diligent setup, launch practice and good execution on contest day, you can also stay on tow as long as you want and become pop-off free.
With confidence in your setup and launching your sailplane you’ll no longer be concerned about a “pop-off” rule at the contests you attend. As per the rule at the Nats – “unless there is a failure of the launch equipment there’ll be no such thing as pop-offs – just low launches!” Follow my advice above and you won’t be making any more of those!
The bonus is that once you are no longer concerned about “pop-offs” you will find yourself more concerned about optimizing your launches for maximum altitude. Remember – the launch is the first element of the TD task. The higher you launch the easier the remainder of the task becomes. (Launch optimization for max height will make a great topic for a future RC Soaring column.)
Until then – launch safely and no more low launches.
Gordon Buckland

